Email integration features in Creatio let you track the history of your cooperation with customers. The emails that you receive will be bound to other Creatio objects automatically. You can create and manage emails and run business processes by email directly in Creatio.
Open the email area by clicking the ![]() button on the communication panel. The button counter displays the number of unread email messages.
button on the communication panel. The button counter displays the number of unread email messages.
At the top of the Email tab on the communication panel, you can see filters and buttons for managing emails (Fig. 1). You can:
-
create a new email message
-
add a new account and set up your mailbox
-
upload emails to Creatio
-
filter your emails, for example, display only the outbound or unprocessed email messages

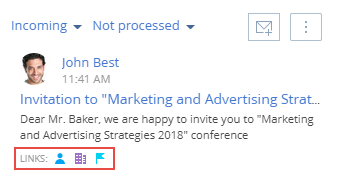
Email messages are displayed as a list. You can see the sender's data, time of sending, email subject, and the initial text in every email. At the bottom of each email, you can see the icons of all bound objects (Fig. 2).
Send an email
-
Click the
 button in the communication panel.
 -
Click the
 button to create an email.
 -
Fill out the required fields on the email page:
-
Select the mailbox to send the email in the From field. If you configured an email signature, it will be added to the text area.
-
Specify the recipient's email.
-
Click the Cc and Bcc buttons to display the Carbon copy and Blind carbon copy fields (optional).
-
Specify the message subject.
-
Enter the email body.
-
Paste the image from the clipboard or drag the image to the email text to add an image to the email body (Fig. 3).
Fig. 3 Dragging the image to the email
-
-
Click the General information tab.
-
Fill out the standard activity fields (such as Show in calendar, Start, Due, etc.) if the email must be displayed as a calendar activity.
-
Fill out the corresponding fields in the Connected to field group if the email is bound to other Creatio objects, such as accounts and documents.
-
-
Click the Attachments tab of the email page to add an attachment.
-
Click the Add file button. This opens a box.
-
Select the file to attach in the box that opens.
-
-
Click Send.
As a result, the email will be sent from the mailbox specified in the From field to the addresses specified in the To, Cc, and Bcc fields. The email sending status will be changed to “Completed.”
Send a template-based email
You can use email templates when sending emails using the  action panel button. The action panel is available in several system sections, such as Contacts, Accounts, Leads, etc.
To create an email based on a template:
-
Click the
 button on the action panel of a record page.
 -
Fill out the needed fields (From, To, Subject, etc.) in the email message area.
-
Click the /... button to open the template lookup instead of entering message text (Fig. 4).
Fig. 4 Select an email template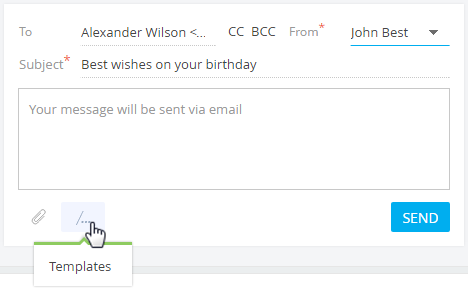
-
Select the needed template.
The template list displays the records from the Email templates lookup. If you are creating an email from a contact page, the list displays only those templates that have the “Contact” specified as a source of macros, as well as any templates that have no source specified at all. The same applies to accounts, leads, etc.
As a result, the text of the selected template will be added to the email. Macros, such as the recipient's name and the sender’s name will be highlighted in the text.
-
Edit the template text if needed and click the Send button.
You can add and modify templates in the Email templates lookup. The Content Designer is used for creating and editing email templates.
Receive emails
-
Click the
 button in the communication panel.
 -
Select Synchronize email in the
 menu (Fig. 5).Fig. 5 Synchronize email
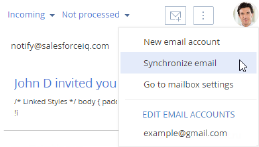
As a result, emails will be downloaded from the synchronized email server folders. Email attachments will be automatically added to the Files detail of the Attachments tab.
Each time an email is downloaded, Creatio automatically performs initial email processing:
-
The From field value is associated with the communication options of contacts and accounts registered in the system. If the match is found, the Account and Contact fields on the email page will be populated automatically.
-
If no match is found, the system analyzes the values in the To, Cc, and Bcc fields. Then, if the match is found, the Account and Contact fields on the email page will be populated automatically.
-
Creatio also verifies the rules for binding emails to other Creatio objects. Read more >>>
As a result, the user who loaded the email will be specified as the record's author and owner.
Process emails
An email is considered processed if either the Account or Contact is specified and at least one of the connection fields, for example, Opportunity or Contract, is filled out.
When uploaded, the emails are processed automatically according to the email binding rules.
The emails that were not processed automatically require manual processing.
-
Display the unprocessed emails by selecting the Not processed filter (Fig. 6).
Fig. 6 Filter emails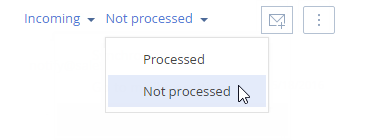
-
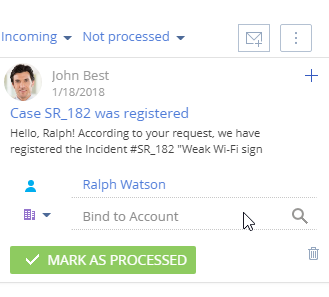
Select the email to process (Fig. 7).
Fig. 7 Select an unprocessed email
-
Bind an email to Creatio records. Learn more about the manual binding of emails to Creatio records in the Link emails to existing records article
-
Click the Mark as processed button. If the email that you processed is part of an email thread, Creatio will offer to process all emails in the thread.
As a result, this email or email thread will no longer be displayed in the list of unprocessed emails and the Needs processing checkbox on its page will be cleared. To view the list of processed emails, select the Processed filter in the filter area.
Run a business process by an incoming email
You can set up the list of business processes involved in email management. For example, if a customer expresses interest in your products in his email, a new lead has to be created, if the email contains a request or a question, the system has to register a case.
To run a business process by email:
-
Click the
 button on the communication panel.
 -
Select the email to run the business process by.
-
Select the process to run by the current email from the
 menu (Fig. 8).Fig. 8 Run a process by email
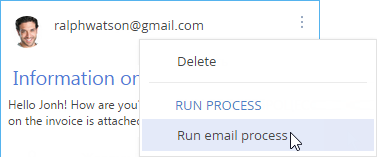
As a result, the business process will be run by the selected email.
 menu of the email, add the “Email Process” tag, as well as a parameter with the “RecordId” code and the
 Add records based on emails
You can create a new record in any Creatio section based on an email message from the communication panel. For instance, you can add a new contact based on an email from an unknown sender. His email address and name will be automatically filled in on his edit page with the data from the linked email message. If you add another record (i. e., an opportunity, invoice, or an order), Creatio will automatically populate its corresponding fields on the contact page with the corresponding data from the email message. For instance, when you create a new opportunity, the Customer field on the opportunity page will contain the name of the account or contact.
To create a new contact record based on an incoming email:
-
Click the
 button in the communication panel.
 -
Select an email message.
-
Click the
 button in the top right corner of the email message and select the Add new command (Fig. 9).Fig. 9 Add a new record based on an email message in the communication panel
-
Select an object (the type of Creatio record to create) from the menu, for example, “Contact” (Fig. 10).
Fig. 10 Select the type of Creatio record to add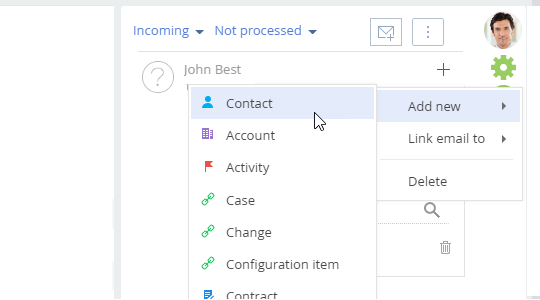
-
A new contact edit page will be created, its Name and Email will be populated with the email message data. You can modify the entered data manually before saving the changes (Fig. 11).
Fig. 11 The page of the contact created from the email message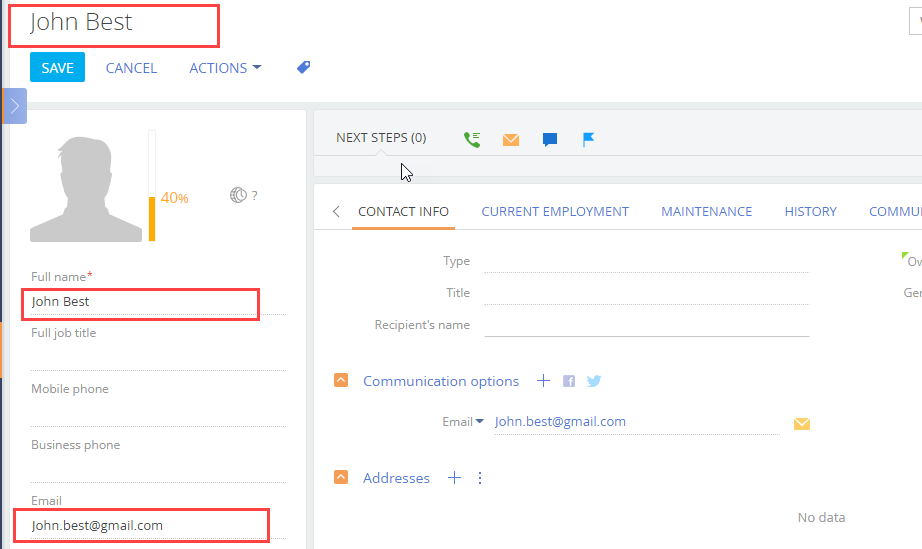
As a result, a new record based on the email message data will appear in the Contacts section.
Link emails to existing records
You can bind email messages to other records manually:
-
By using a special email field where you can specify a Creatio record to bind (Fig. 12).
-
By clicking the
 button in the top right corner of the email message (Fig. 13).
 button
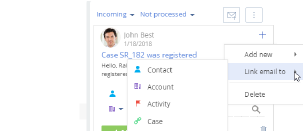
-
By using the General information tab of the email message page. To open the email message page, click its subject.
As a result, the bound email message will be displayed in the History tab of the activity page.
Auto-link emails to existing records
To bind an incoming or outgoing email to other Creatio objects, set up the binding rules in the Rules for connecting emails to system sections lookup. For example, if the email subject contains an invoice number, the email will be automatically bound to the corresponding Creatio invoice.
To set up the binding rules:
-
Open the System Designer by clicking the
 button in the top right corner of the application window.
 -
Click the “Lookups” link in the “System setup” block.
-
Open the Rules for connecting emails to system sections lookup.
-
Click the Add rule button or open an existing rule for editing on the lookup page.
-
Fill out the required fields (Fig. 14) on the displayed page:
Fig. 14 Set up the binding rules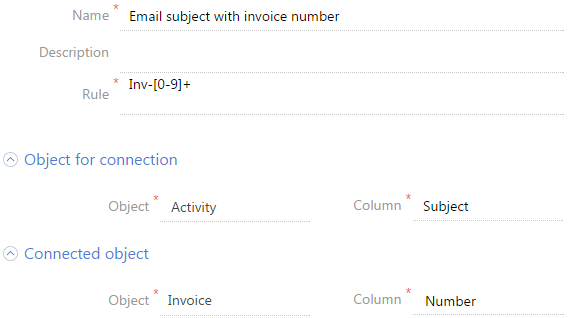
-
Specify the rule name, for example, “Email subject with invoice number.”
-
Enter a regular expression that would match the subject text in the Rule field, such as the invoice number prefix.
For example, if the following invoice auto numbering format is set up as follows: Inv-1, Inv-2, Inv-3, ..., Inv-n, the regular expression is Inv-0-9 +. As a result, when the following email is received - “Additional information for Inv-53,” Creatio will automatically verify whether the specified invoice exists. If the invoice is found, the Invoice field on the email page will be populated with the corresponding value.
-
Fill out the Object for connection field group. To automatically bind emails to Creatio objects, select “Activity” in the Object field. In the Column field, specify the field to bind by. The system performs the match search using the email subject. It is located in the Subject column.
-
Fill out the Connected object fields group. In the Object field, select the system object that the rule is set up for, for example, “Invoice.” In the Column field, select the column to perform the match search. In this case, the column is Number.
-
-
Save the rule.
-
Add the rules for other sections similarly.
As a result, when uploading messages to Creatio and sending emails from the system, the message subjects will be checked according to the configured rules. If the match is found, the connection fields will be automatically populated. In addition, such messages will be automatically considered processed.
Working with emails FAQ
Why do I receive an email notification that the login/password is incorrect after mailbox registration?
Email server security settings sometimes block access to mailboxes from third-party applications. If you entered the information correctly during the email account registration, but still received a notification about an incorrect user name or password, do the following:
-
Enable IMAP access in the mailbox settings. Usually, email forwarding and POP/IMAP protocol management settings are in a separate group.
-
Enable access to your email account from third-party applications in the email account security settings.
-
In most cases, the email server sends the users an email about an attempt to connect to the mailbox. Confirm the connection authenticity by following a special link from the email.
-
Repeat the mailbox registration procedure.
How do I set up a custom email provider?
To set up email provider integration, you need to open ports 25 and 587 on the Creatio application server. On the email provider selection page, click the Add provider button, select the provider type and fill out the send/receive settings. Learn more about the detailed procedures for email provider setup in separate articles: Add IMAP/SMTP email provider . MS Exchange / Microsoft 365 email, contacts, and calendar.
Why no emails can be received in Creatio after a successful mailbox synchronization setup?
This can occur if one of the following is the case:
-
The “Activity” object includes a custom field required on the application level.
To ensure Craetio receives emails properly, modify the field attributes. Make it required on the page level, but not required in the object.
-
The emails received from an IMAP mail server have been downloaded to Creatio and then deleted, or they have been downloaded to any other email client earlier.
To upload the email to Creatio, change the name of the lookup based on the “EmailSynchronizedKey” object to an arbitrary name.
How to set up a shared mailbox?
Shared email accounts are used for email communication between the support team and users. Shared mailbox setup is similar to individual mailbox setup in general, but has a number of additional steps.
Why the outgoing emails are not imported to Creatio?
You can set up the import of all emails from your mailbox to Creatio. Alternatively, you can import emails from specific mailbox folders only. Check your email account folder settings for email import.
If your mailbox security settings restrict access to certain mailbox folders for third-party applications, these folders will be unavailable for importing into Creatio. To permit access to these folders for third-party applications, modify your mailbox security settings.
Also, in some cases, outgoing emails might not import from MS Outlook, because not all email servers support saving emails sent from third-party applications.
Why do I receive the “Error sending email, please contact system administrator” message when trying to send emails?
This error might be the result of the following:
-
sending emails is restricted on the provider level
-
no connection to SMTP server
-
one of the following ports is closed on the SMTP server: 25, 465, 587
Contact your system administrator to determine the exact cause of the error and correct it.
I cannot see the Email detail in the Contacts section. Why?
The Email detail is not displayed for contacts who have “Employee” specified in the Type field and “Our company” specified in the account profile. Use Creatio development tools to modify this logic.